In underwater photography, lights are not just for "seeing"; they are artistic tools for sculpting light and shadow, restoring color, and conveying mood. Forget about direct on-camera lighting—let's explore how to paint with light.
I. The Fundamental Principle: Why You Should Avoid Direct Light
Core Problem: Direct on-camera flash causes overexposed foregrounds, pitch-black backgrounds, flat-looking images, and severe backscatter (where the light illuminates suspended particles between the camera and the subject, creating ugly white specks).
The Solution: Embrace one key concept—Off-Camera Lighting. This is the cornerstone of all advanced underwater lighting techniques.

II. Core Lighting Techniques: From Beginner to Pro
1. Two-Light Setup: The Source of Dimension
-
What it is: Using two strobes or video lights, positioned on either side of the camera.
-
How to do it:
-
Extend your arms so the light sources are on either side of the housing, slightly above the lens axis.
-
Try adjusting the angle and power of each light to avoid perfectly symmetrical light, creating more natural shadows.
-
-
The Effect: Eliminates harsh singular shadows, makes subjects look three-dimensional, and produces even, saturated color. This is the most common and versatile setup.
2. Side Lighting: Creating Drama and Texture
-
What it is: Positioning your primary light to illuminate the subject from the side (left or right).
-
How to do it:
-
Turn off or significantly reduce the power of the light on the opposite side.
-
Carefully adjust the angle so the light rakes across the surface of the subject.
-
-
The Effect:
-
Maximum Dimension: Creates strong contrast between light and shadow, emphasizing texture and shape (e.g., coral folds, shipwreck rust, fish scales).
-
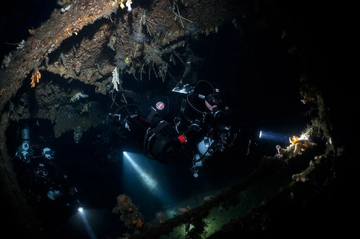
Dramatic Mood: Creates a mysterious, dramatic atmosphere. Perfect for wrecks, caves, and subjects with complex structures.
-

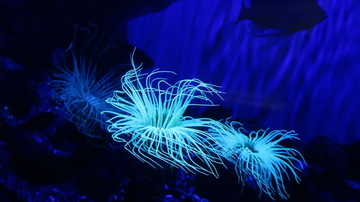
3. Backlighting: Creating Magical Silhouettes
-
What it is: Placing the light behind the subject, pointing back toward the camera.
-
How to do it:
-
Find transparent or translucent subjects like jellyfish, nudibranchs, coral polyps, or seaweed.
-
Position the light behind them, carefully adjusting to avoid lens flare.
-
-
The Effect:
-
Rim Light: Outlines the subject with a bright edge, separating it from the dark background.
-
Translucency: Perfectly reveals the internal structures and gem-like quality of transparent creatures, creating a high-impact image.
-
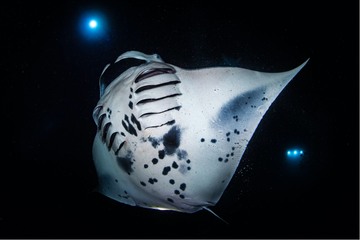
4. Blackwater Photography Lighting
-
What it is: Photographing pelagic plankton at night in the open ocean.
-
Lighting Technique:
-
Main Light: Positioned from a斜上方 (diagonal top) or side to illuminate the subject and reveal its color and details.
-
Focus Light: Use a dim, adjustable focus light to help your camera lock on.
-
Background: Ensure the background is infinite blackness with no light spill to make the subject pop.
-

III. Practical Tips and Considerations
-
Avoiding Backscatter
-
The Culprit: Lights positioned on the same axis as the lens, which illuminates particles in the water.
-
The Solution: Move your lights higher and farther out. The light should "wash" over the subject from the side and above, not "blast" directly at it. This makes suspended particles less visible.
-
-
Controlling Lighting Ratio
-
Don't rely on "Auto": Learn to manually set your strobe or video light power.
-
How to: If using two lights, try using one at full power as the key light and the other at half power as a fill light to fine-tune the shadows.
-

-
Using Ambient Light
-
Wide-Angle Photography: For large scenes (e.g., divers, big coral reefs), use your lights as fill light to illuminate the foreground subject, while using natural light to show the blue water and background depth. This creates a sense of space.
-
Creating Sunballs: In wide-angle, you can try positioning a light to mimic the effect of the sun.
-
-
Distance is Key
-
The Principle: The closer the light is to the subject, the softer the light and more saturated the colors. The farther the light is from the camera, the less backscatter.
-
In Practice: Extend your arms to get your lights as close to your subject as possible, while keeping them away from your lens.
-

IV. Lighting Strategy Cheat Sheet for Different Subjects
| Subject | Recommended Technique | Key Tip |
|---|---|---|
| Small Macro Life | Two Lights (symmetrical or slight side), arms tucked in, lights close to subject | Use lower power to avoid blowout. Use light to outline details. |
| Corals, Nudibranchs | Side Lighting (best) or Two Lights | Side lighting perfectly reveals texture and structure. |
| Transparent Subjects (Jellies, etc.) | Backlighting (best) or Side-Backlight | Highlights their translucent, glowing quality. |
| Portraits / Buddies | Two Lights from a slightly high angle | Avoid "ghost light" from below. Softens facial shadows. |
| Wide-Angle / Wrecks | Two Lights fill the foreground, use ambient light for the background | Lights only illuminate the first few meters. Creates layers. |
| Blackwater / Pelagics | One or two lights from above/side, black background | Nail focus. Use a small aperture (f/16-f/22) for depth of field. |
Final Remember: There are no fixed rules in underwater lighting. The best way to learn is to dive more, practice more, experiment more. Before a dive, set a lighting goal (e.g., "today I only practice side lighting"). You will see rapid improvement.
Now, take your lights, dive in, and start painting!